FocusTool
Complete User Manual & Setup Guide
The portable focus app for grandMA3, grandMA2 & ChamSys MagicQ.
Release Notes
For a full overview of all changes, new features, and bug fixes per version, see the dedicated Release Notes page.
View Release Notes1. Introduction
Welcome to FocusTool – the professional software solution that revolutionizes how you control lighting equipment. Developed by YourLD & MAOSS, FocusTool bridges the gap between traditional console operation and modern, intuitive control methods.
What is FocusTool?
FocusTool is a precision focusing application that allows you to control your lighting fixtures using a handheld gaming console. By leveraging OSC (Open Sound Control) and Telnet, it provides integration with grandMA3, grandMA2, and ChamSys MagicQ consoles.
Gaming Controller Support
Works with all handheld Windows gaming consoles like the MSI Claw and Steam Deck for precise, analog movement control with customizable sensitivity and dead zones. (MSI Claw recommended)
OSC Communication
Industry-standard OSC protocol ensures reliable, low-latency communication with your lighting console.
Fully Customizable
Remap buttons, adjust sensitivity curves, invert axes, and create multiple speed profiles to match your workflow.
Integrated Web Remote
Launch grandMA3 Web Remote directly from FocusTool as an integrated overlay within the main application for seamless operation.
Real-time Feedback
Live status updates, movement values, and comprehensive logging keep you informed of all operations.
Portable Ready
Optimized for handheld PCs like MSI Claw and Steam Deck, turning them into portable focusing stations.
Key Benefits
- Speed up your workflow: Analog control is faster and more intuitive than encoder wheels
- Improved precision: Fine-tune movements with variable speed controls and boost functions
- Reduced fatigue: Ergonomic controller design reduces strain during long programming sessions
- Consistent experience: Same handheld-first workflow across the supported console families
- Portable operation: Take your focusing setup anywhere with handheld PC compatibility
2. System Requirements
Minimum Requirements
| Component | Minimum Requirement | Recommended |
|---|---|---|
| Operating System | Windows 10 (64-bit) / Linux (SteamOS) | Windows 11 (64-bit) |
| RAM | 2 GB | 2 GB or more |
| Storage | 500 MB free space | 500 MB free space |
| Display | 1280x720 resolution | 1920x1080 or higher |
| Controller | Windows Handheld Gaming Console | MSI Claw |
| Network | Ethernet or WiFi | Gigabit Ethernet |
Tested Handheld Devices
- MSI Claw: Highly recommended, optimized experience
- Steam Deck: Good compatibility in SteamOS Desktop Mode
- ASUS ROG Ally: Compatible with minor setup
- GPD Win series: Basic compatibility
3. Installation & First Setup
Download & Installation
- Download FocusTool from the official website or your purchase confirmation email.
- Extract or install the file:
• On Windows, extract the ZIP file to your desired location (e.g.,C:\Program Files\FocusTool\) and runFocusTool.exe.
• On Linux / SteamOS, downloadFocusTool.binand place it anywhere you like (e.g., your Desktop). Make it executable via Properties → Permissions → "Allow executing file as program", then double-click to start. - Ensure your handheld console is on and ready before launching FocusTool.
- Run the application . On Windows, run as Administrator for the first launch; on Linux you may need to confirm execution the first time.
- You must be in Desktop Mode to install and use FocusTool correctly.
- In Desktop Mode, if you want the sticks and buttons to behave like a true Gamepad (not as a mouse), hold the Start button for a few seconds to switch to joystick control.
- Without Desktop Mode and this Start-button toggle, controller input will not be mapped correctly and FocusTool will not function as intended.
- Make sure the MSI Claw is in Gaming Mode. Press the lower black button on the right side of the screen (one of the two small buttons) to open the MSI control overlay.
- In the middle of this overlay you will see Control Mode. This must be set to Gamepad. If it shows something else (for example "Mouse"), Windows will not expose the controller as a gamepad and FocusTool cannot use it correctly.
- If FocusTool shows
Disconnected, your controller is not detected:- First, double-check that the MSI Claw is really in Gaming Mode and that Control Mode = Gamepad in the overlay.
- If that is correct, your controller drivers may be missing or not loaded correctly. A full restart of the MSI Claw often fixes cases where Windows did not load the controller properly in Device Manager.
- If pressing the lower black button does not show the MSI overlay at all, the MSI Claw firmware or tools are likely missing or outdated. Install the latest firmware and driver package from the MSI website:
https://www.msi.com/support/download → Handhelds → your MSI Claw model
FocusTool.exe or FocusTool.bin in your antivirus and firewall to allow network communication.
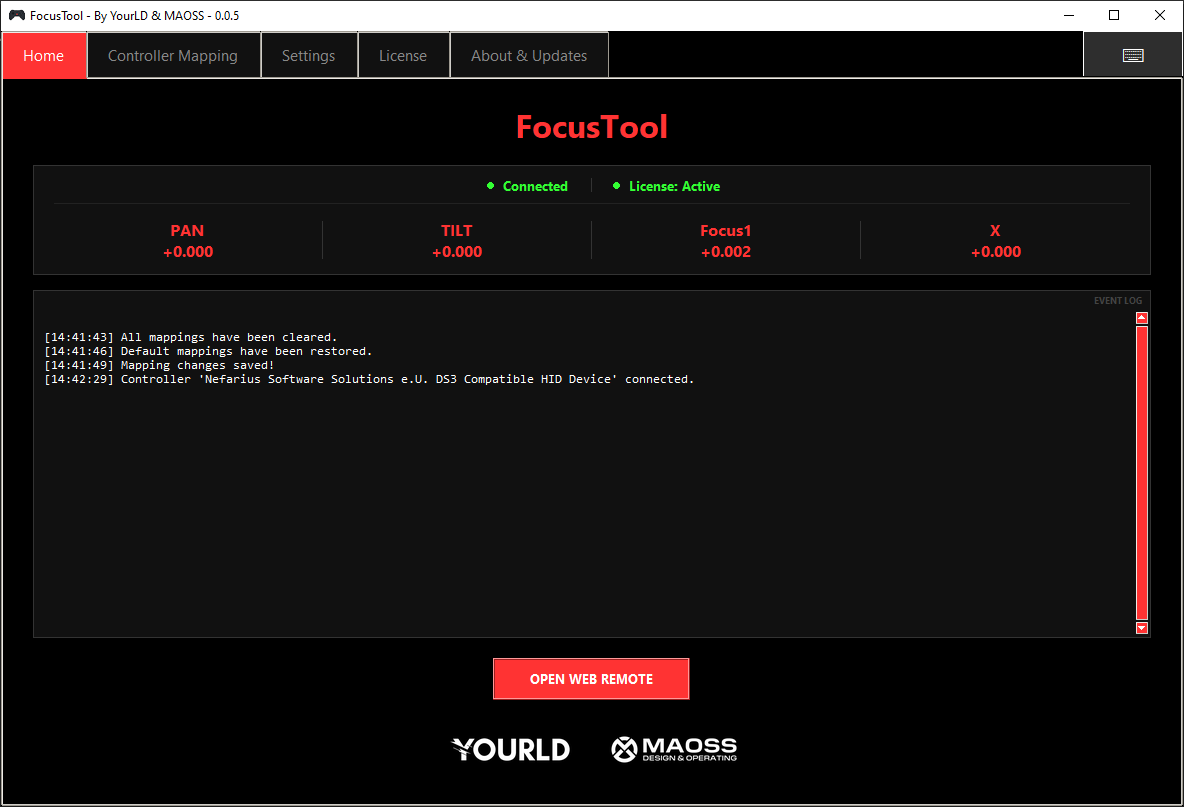
First Launch Process & Interface
On first launch, a splash screen appears while FocusTool initializes. The main interface then opens with several tabs:
| Tab | Purpose |
|---|---|
| Home | Main control interface, real-time values, and status information. |
| Controller Mapping | Customize button and axis assignments. |
| Settings | Network configuration, speed settings, and advanced preferences. |
| License | License activation and status information. |
| About & Updates | Version information and automatic updates. |
Status Bar
At the bottom of the application window, the status bar provides a real-time overview of your connection state and system information.
| Item | Description |
|---|---|
| Controller | Shows whether a gamepad is Connected or Disconnected. |
| License | Shows the current license status (e.g. Licensed to [name]). |
| OSC / Telnet | Displays the connection protocol and its current state (e.g. connected, connecting, error). Helps you verify that FocusTool is communicating with your console. |
| Global Master | When connected via OSC, shows the Global Master user that FocusTool is linked to on the console session. |
| Console | Opens an on-screen console panel to read the system monitor log. |
4. License Activation
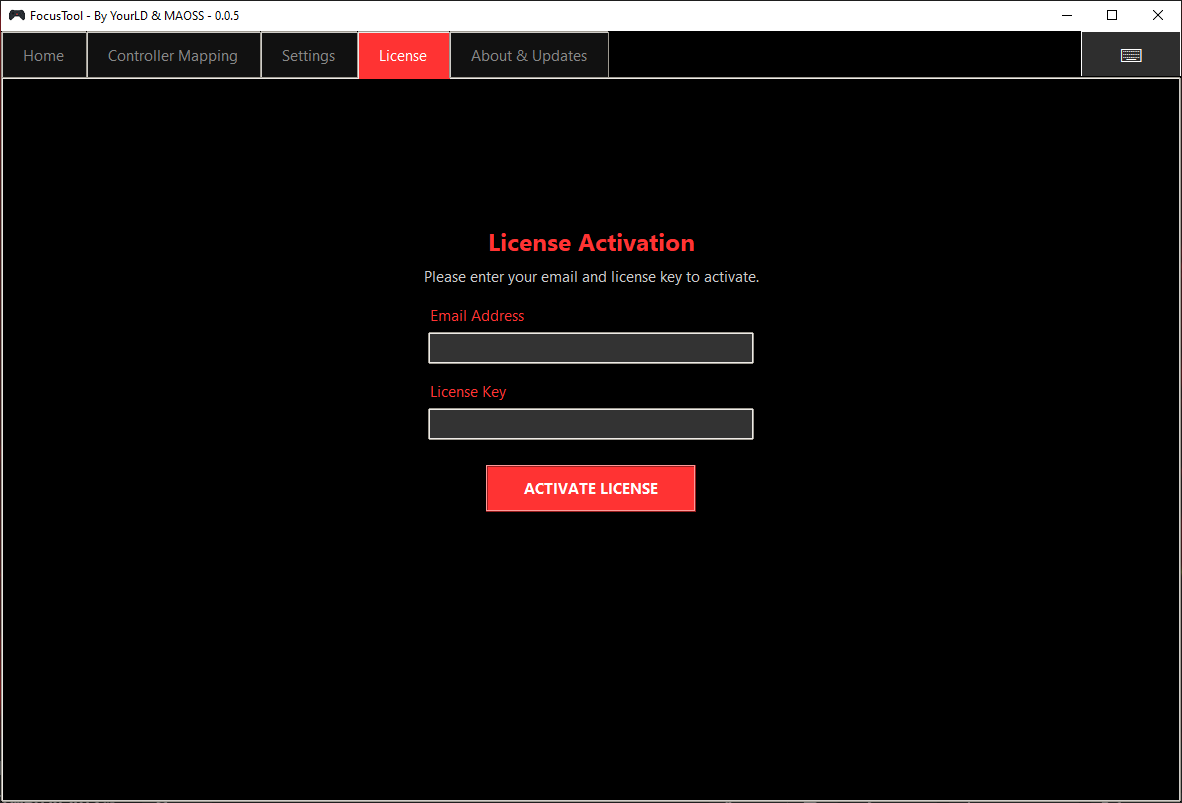
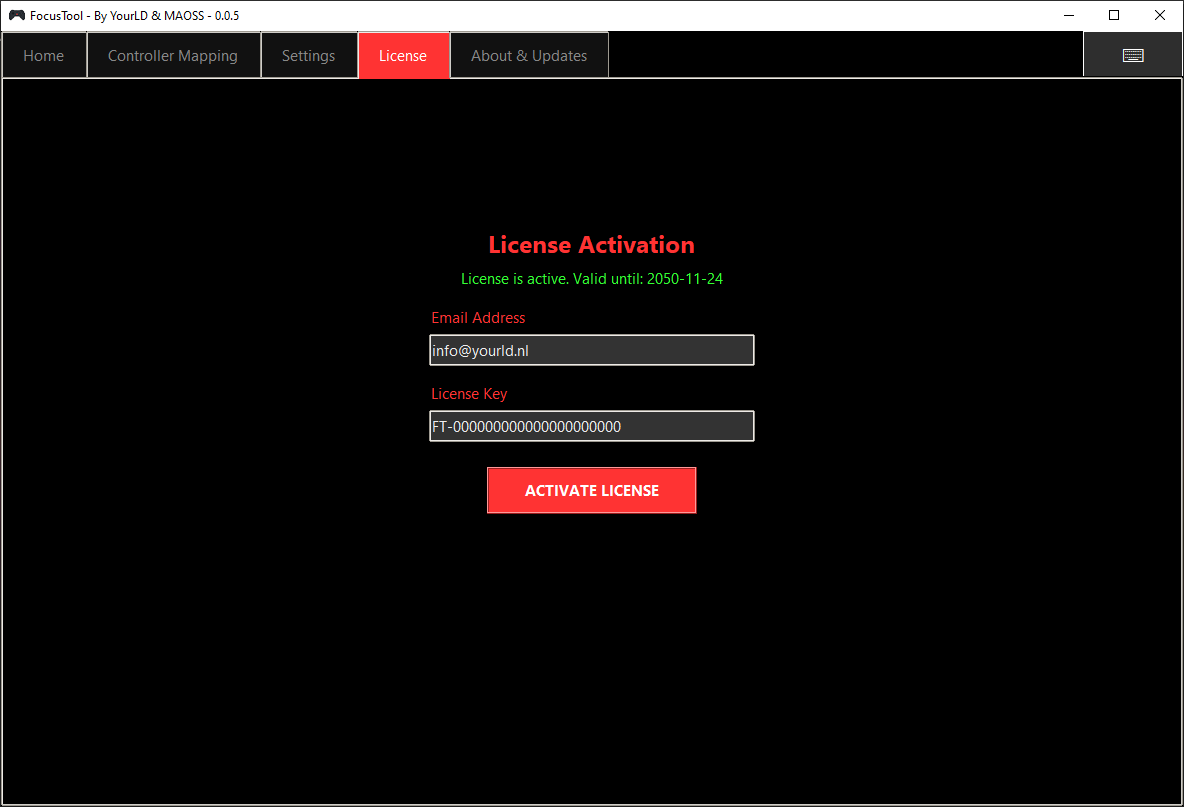
FocusTool requires a valid license for full functionality. Without an active license, OSC commands will not be sent to your console, effectively disabling the core functionality.
Activation Process
- Navigate to the License tab in the main interface.
- Enter your email address that was used during purchase.
- Enter your license key exactly as provided (copy-paste recommended).
- Click "Activate License" and wait for server verification.
- Confirmation will appear if activation is successful.
Important License Information
- One license per device: Each license is hardware-locked to one specific machine.
- Internet required for first activation: A first-time activation cannot be completed fully offline.
- Periodic verification: The app requires an internet connection once every 30 days to verify your license. Between checks the app works fully offline.
- After update: The first time you launch a new version, an internet connection is required to re-verify your license.
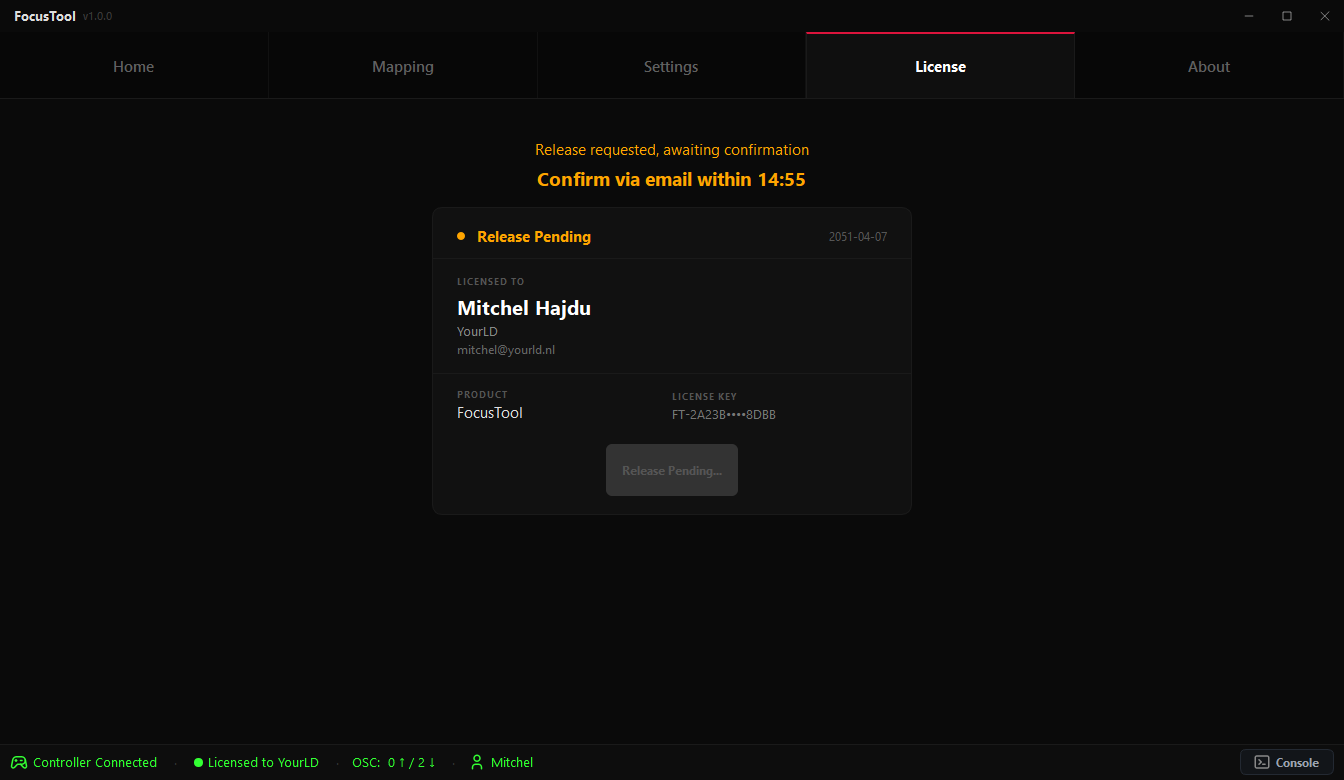
- Self-release: You can request a license release yourself from the active device.
- Important: Your license cannot be reactivated on the current device after release.
Self-release flow
- Open the License tab on the device that currently holds the activation.
- Click "Request License Release" and confirm the request.
- Confirm the pending release within 15 minutes from the account portal or the confirmation email.
- After confirmation, the license is released and can be activated on a different device.
- Important: your license cannot be reactivated on the current device after release.
5. Network Configuration
Proper network setup is crucial for FocusTool to communicate with your lighting console. This section covers both OSC communication and Web Remote integration. A high-quality, powerful access point is essential for a stable and responsive connection. Using a subpar or consumer-grade router can lead to latency, delayed responses, or connection drops.
Basic Network Setup
- Open the Settings tab in FocusTool.
- Locate the network configuration section.
- Configure OSC settings for your console.
- Set up Web Remote (optional but recommended for grandMA3).
- Save your settings and test connectivity.
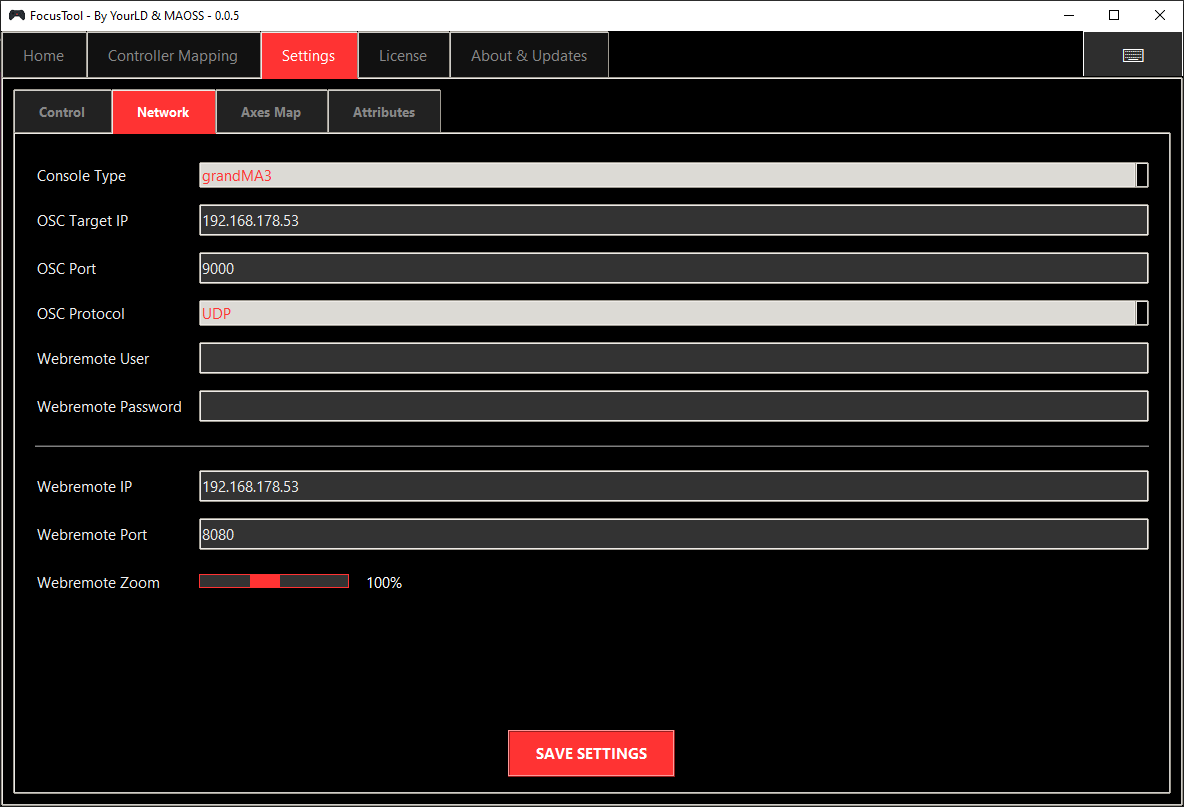
OSC Configuration
| Setting | Description | Example |
|---|---|---|
| OSC Target IP | IP address of your lighting console. | 192.168.1.100 |
| OSC Port | OSC input port on your console. | 9001 (grandMA3 default) |
| OSC Protocol | Select how FocusTool sends commands to the console. | UDP (default) / TCP |
Console-Specific Settings
grandMA2 Configuration
grandMA2 uses Telnet communication. To enable Telnet on a grandMA2 console, follow these steps:
- Navigate to: Setup → Global Settings → Telnet.
- Set "Login Enabled" to enabled.
- Navigate to: Setup → Global Settings → Remotes.
- Set "Login Enabled" to enabled.
Important: You must enter your username and password (if applicable) in FocusTool's Settings tab under Network Configuration. FocusTool will use these credentials to authenticate with the grandMA2 console via Telnet.
Unlike grandMA3, grandMA2 connections are user-based, which means multiple FocusTool instances can operate on the same session simultaneously by logging in with different User Profiles.
grandMA3 Configuration
To enable OSC communication on a grandMA3 console, follow these steps precisely:
- Navigate to: Setup → In & Out → OSC.
- Add a new OSC configuration entry.
- Configure the settings as follows:
- Destination IP: Your Console's IP
- Mode: UDP
- Port: 9001 (or as configured in FocusTool)
- Receive: Yes
- Send: Yes
- Receive Command: Yes
- Send Command: Yes
- Echo Input: Yes
- Echo Output: Yes
Important: Make sure you Enable output and input. On grandMA3, OSC commands are currently handled by the session's Global Master user only (multi-user sessions: other users will not receive programmer updates from OSC yet). On grandMA2 this limitation does not apply because Telnet connections are user-based. Restart your console software after setting up OSC to ensure changes take effect.
ChamSys Configuration
Important: These OSC settings must be configured on the master desk console, not on your handheld device. To enable OSC communication on the master desk, follow these steps precisely:
- On the master desk console, navigate to: Setup → Multi Console → Enable Remote Control and set it to [YES].
- Navigate to: Setup → Network.
- Configure the OSC settings as follows:
- OSC Mode: Enable both TX and RX
- TX & RX Port: Use the same port (e.g., 9000 or 9001)
- OSC Tx IP: Set to 0
Important Notes:
- ChamSys uses a fixed attribute library (read-only). Attributes are predefined by the MagicQ console and cannot be added or removed in FocusTool.
- For complete functionality, you will need MagicQ installed and configured on your handheld device (see the ChamSys Setup section).
- In MagicQ, go to: Macros → View Autom → Insert Autom
- Select: Type OSC Message → Function Run Macro → F1 [Macro ID]
- Other actions can also be attached to OSC messages.
You can then send these custom OSC commands from FocusTool using the OSC action type in Controller Mapping.
Web Remote Setup
The following settings apply to grandMA2 and grandMA3 consoles only:
| Setting | Description | Example |
|---|---|---|
| Webremote IP | IP address for accessing the console's web interface. | 192.168.1.100 |
| Webremote Port | HTTP port for web remote access. | 8080 (grandMA3 default) |
6. Controller Setup & Mapping
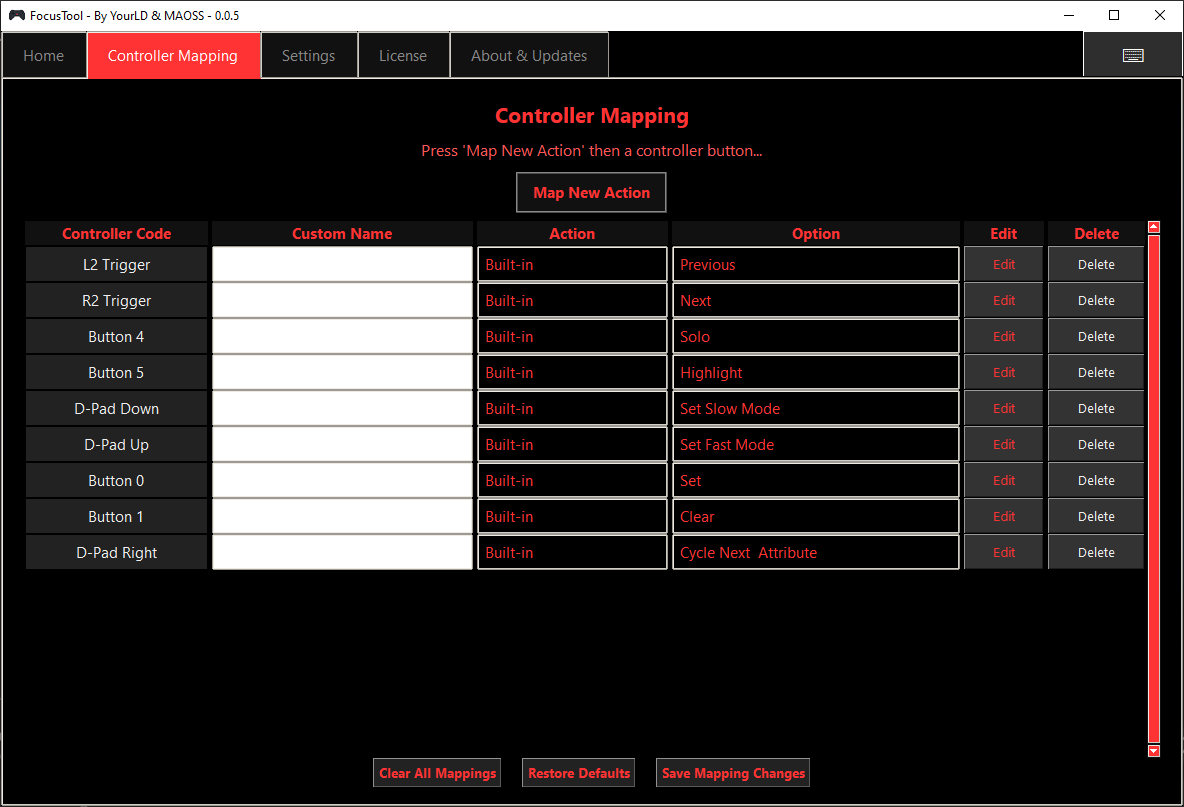

The Controller Mapping tab is where you customize your controller layout to fit your workflow perfectly. You can assign console functions, custom commands, and internal app functions to any button.
Action Types Explained
| Action Type | Description | Examples |
|---|---|---|
| Built-in Actions | A predefined list of common console and app functions. | Highlight, Solo, Next, Toggle Invert Pan, Quick Mapping, Pan/Tilt Invert Toggle, Slow/Fast Speed Toggle. |
| OSC | Allows you to send any custom OSC command string. Tip: Commands now loop while holding the button. | Group 1 At Full, Go+ Cue 1 |
| Attributes (Buttons) | Map a specific attribute directly to a button. | Assign a button to "Zoom (+)" or "Iris (-)" with Slow or Fast speed. |
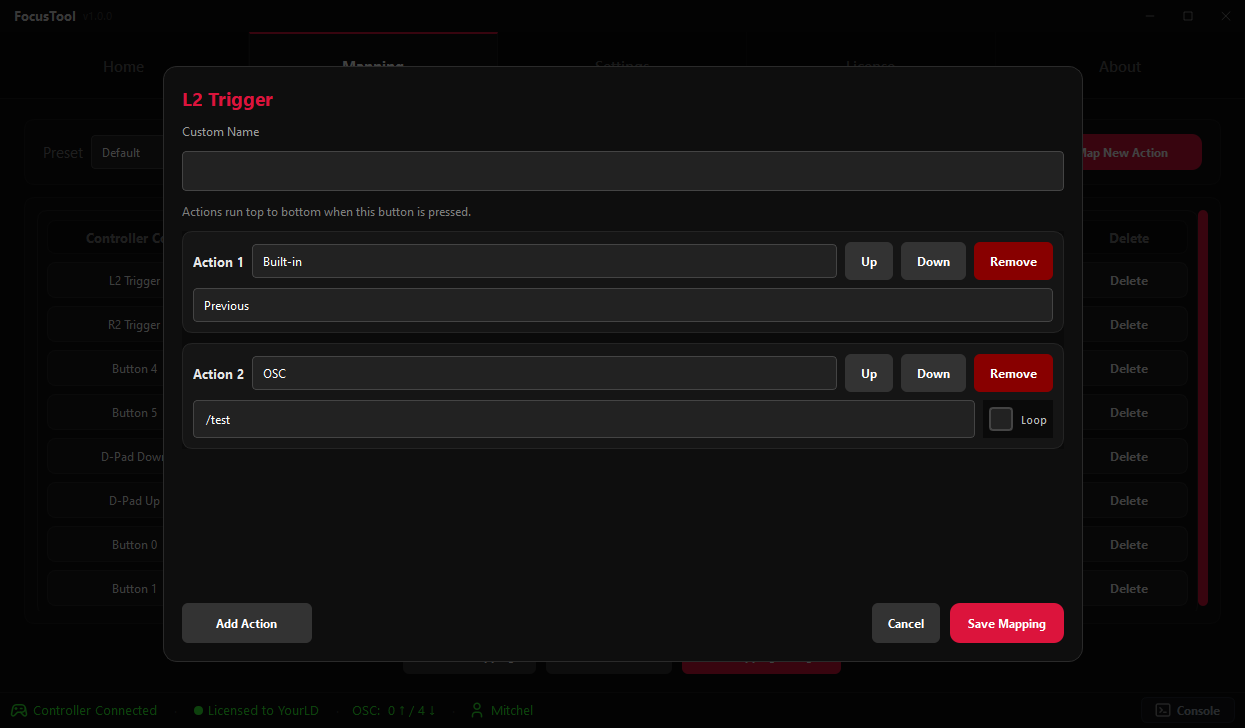
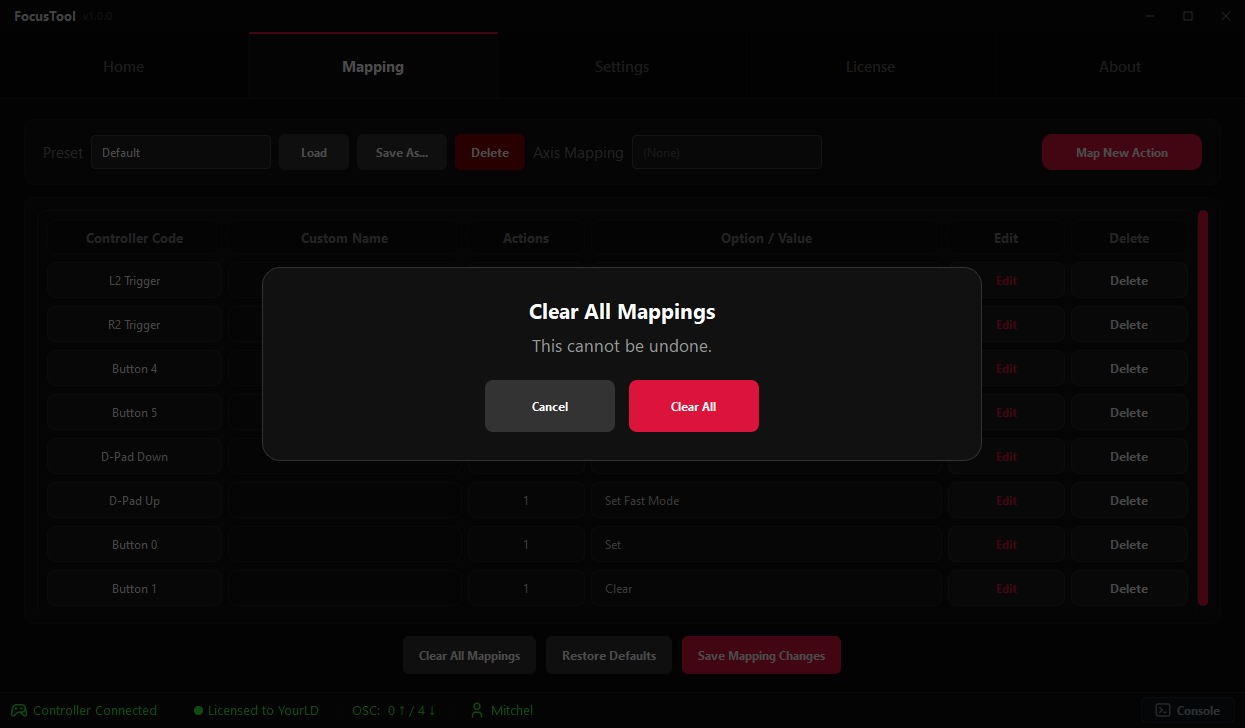
How to Create a Custom Mapping
- Navigate to the Controller Mapping tab.
- Click "Map New Action". The status will change to "Listening...".
- Press the desired button or trigger on your controller. A new entry appears in the mapping table.
- Click "Edit" on the new entry. An edit overlay opens where you configure the action.
- Select an Action Type (Built-in, OSC, or Attribute) and configure the corresponding option.
- Add more actions to the same button if needed. A single button can trigger multiple actions.
- Give it a custom name (optional, but helpful for identifying mappings at a glance).
- Click "Save Mapping Changes" at the bottom to store your setup.
Map Your Handheld Macro Buttons
FocusTool can also map keyboard presses, which makes it possible to use the physical macro buttons on the back of handheld PCs. The handheld itself must first convert those rear macro buttons into keyboard keys such as F1 or F2.
MSI Claw Setup
- Open MSI Center.
- Click Control Mode.
- Select Gamepad Mode.
- Open Key Mapping.
- Choose the rear macro button you want to map, for example M1 or M2.
- Select Keyboard and assign a key. Recommended: F1 for M1 and F2 for M2.
- In FocusTool, go to Controller Mapping, click Map New Action, then press the rear macro button. FocusTool will detect the assigned keyboard key.
Other Handhelds
The same idea applies to handhelds such as Steam Deck, ASUS ROG Ally and similar devices: use the device's own control software to make a rear button send a keyboard key, then map that key inside FocusTool.
- Use simple keys that are unlikely to conflict with console operation, such as F1, F2, F3, or F4.
- Avoid assigning normal typing keys if you also use text fields or the Web Remote during programming.
- After changing the handheld macro configuration, restart FocusTool if the new key press is not detected immediately.
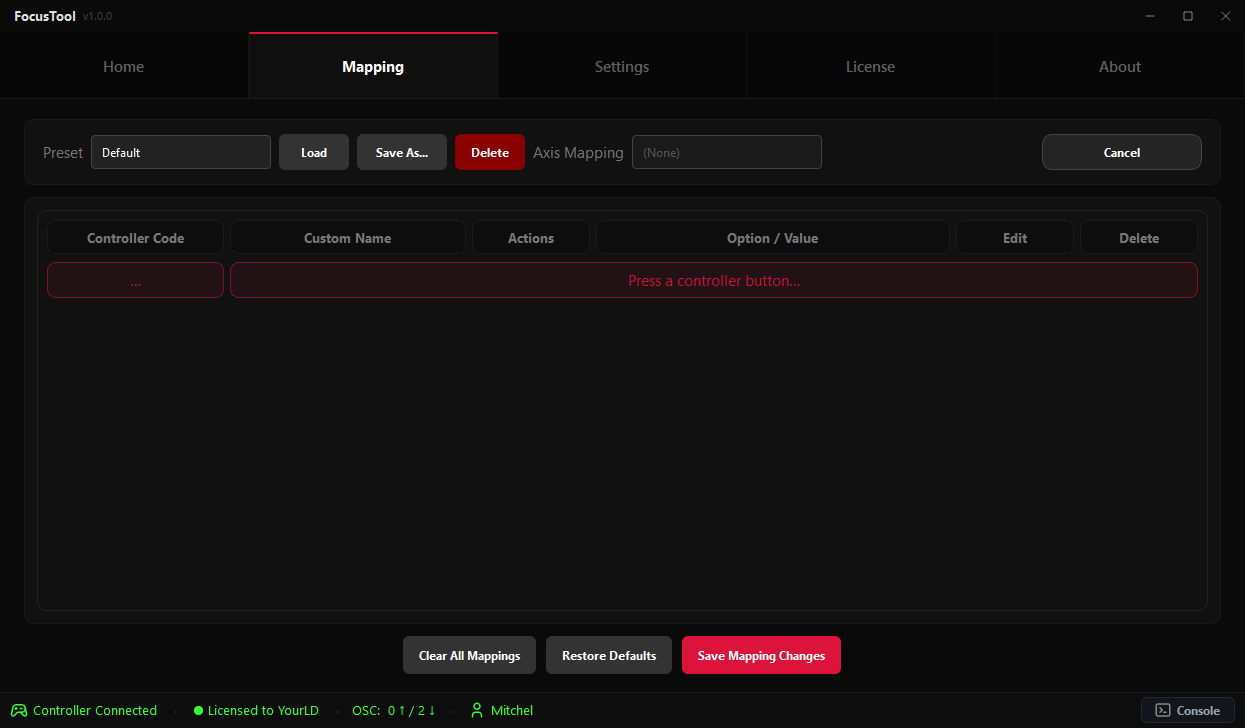
Mapping Presets
You can save full controller mapping presets and reuse them later for different console types, sessions, or operators.
- Load Mapping: Switch to a saved controller mapping preset from a button press.
- Apply Preset: Push a saved axis layout directly from the controller.
- Live refresh: Changes update immediately without needing a restart.
Additional Built-in Functions
Pan/Tilt Invert Toggle
Instantly flips the invert state of both Pan and Tilt with a single button press. Useful when you are standing on stage and your controls are reversed relative to the fixture. One press corrects the orientation without changing any settings.
Slow/Fast Speed Toggle
Switches between Slow and Fast speed mode with one button, saving you a mapping slot. Separate Slow and Fast buttons are still available if you prefer dedicated controls.
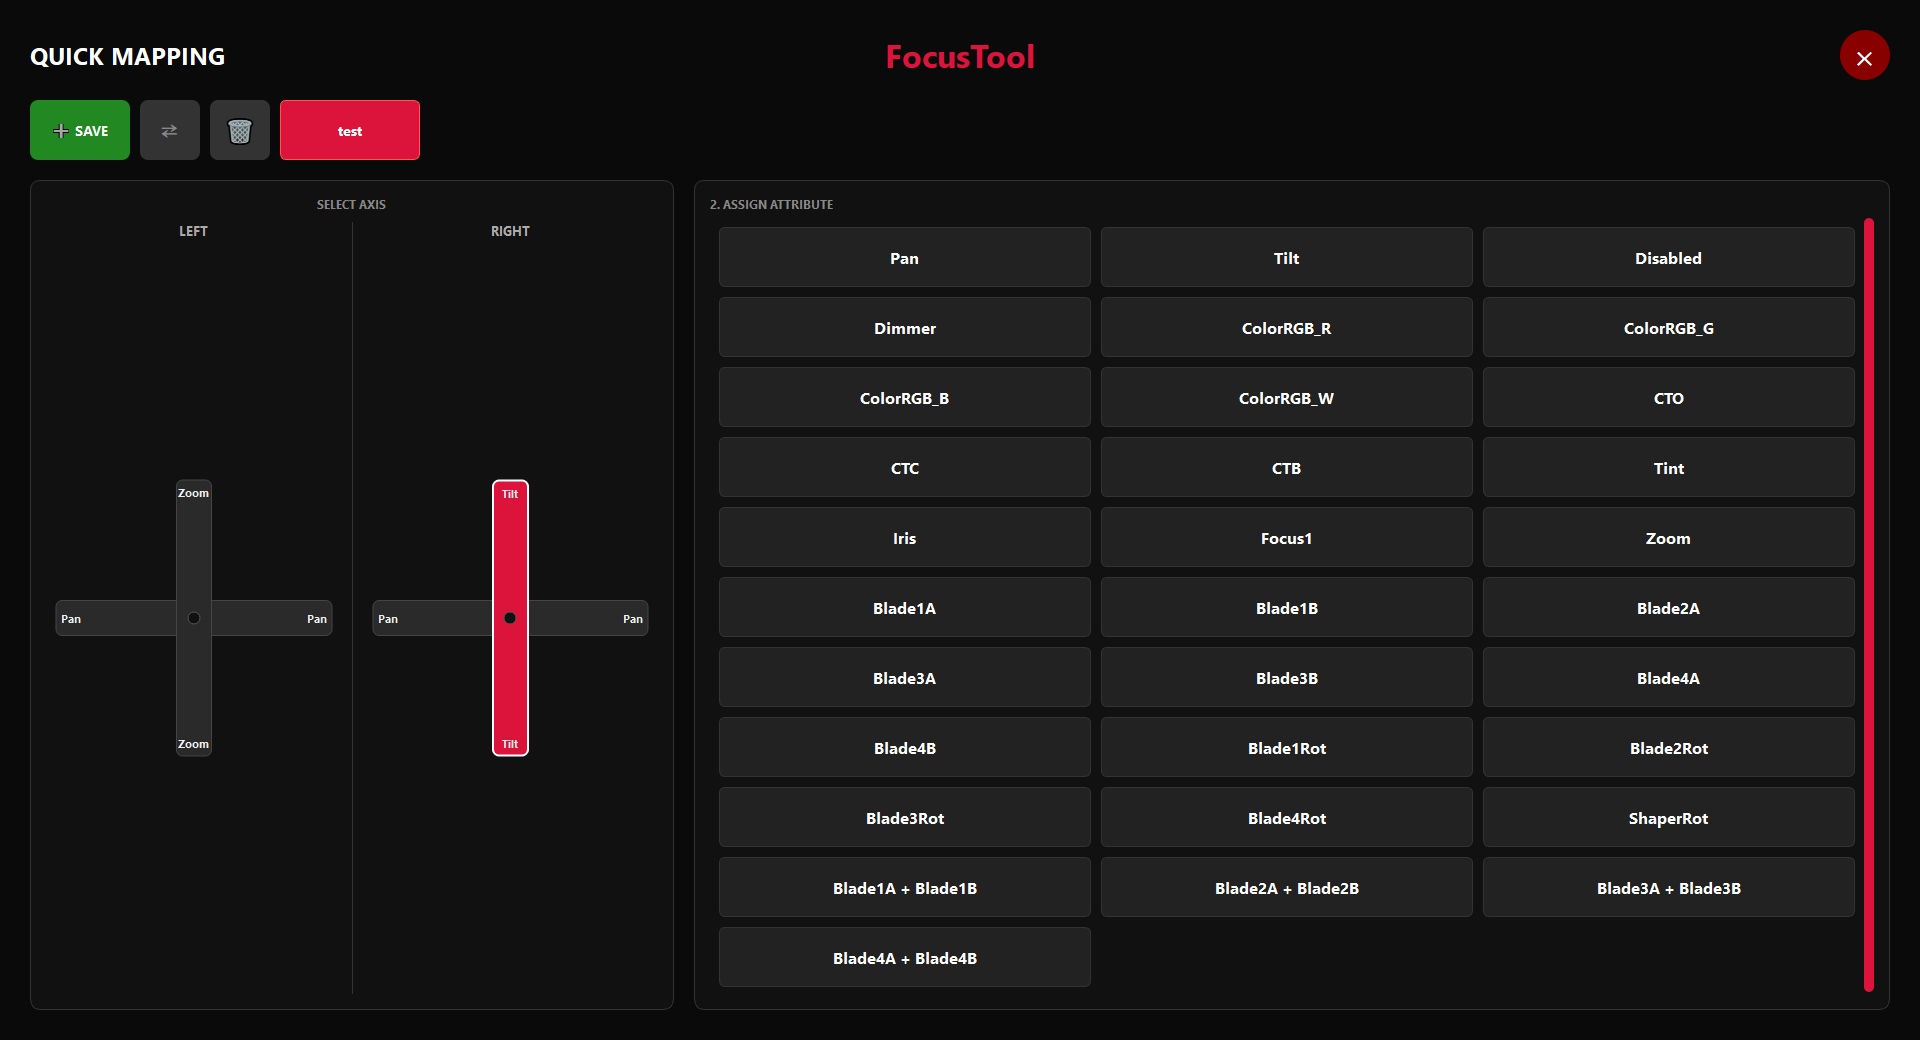
Quick Mapping & Attribute Control (Simultaneous Mode)
Simultaneous Mode allows you to control Pan/Tilt with the Right Stick while using the Left Stick for attributes like Zoom, Iris, or Focus.
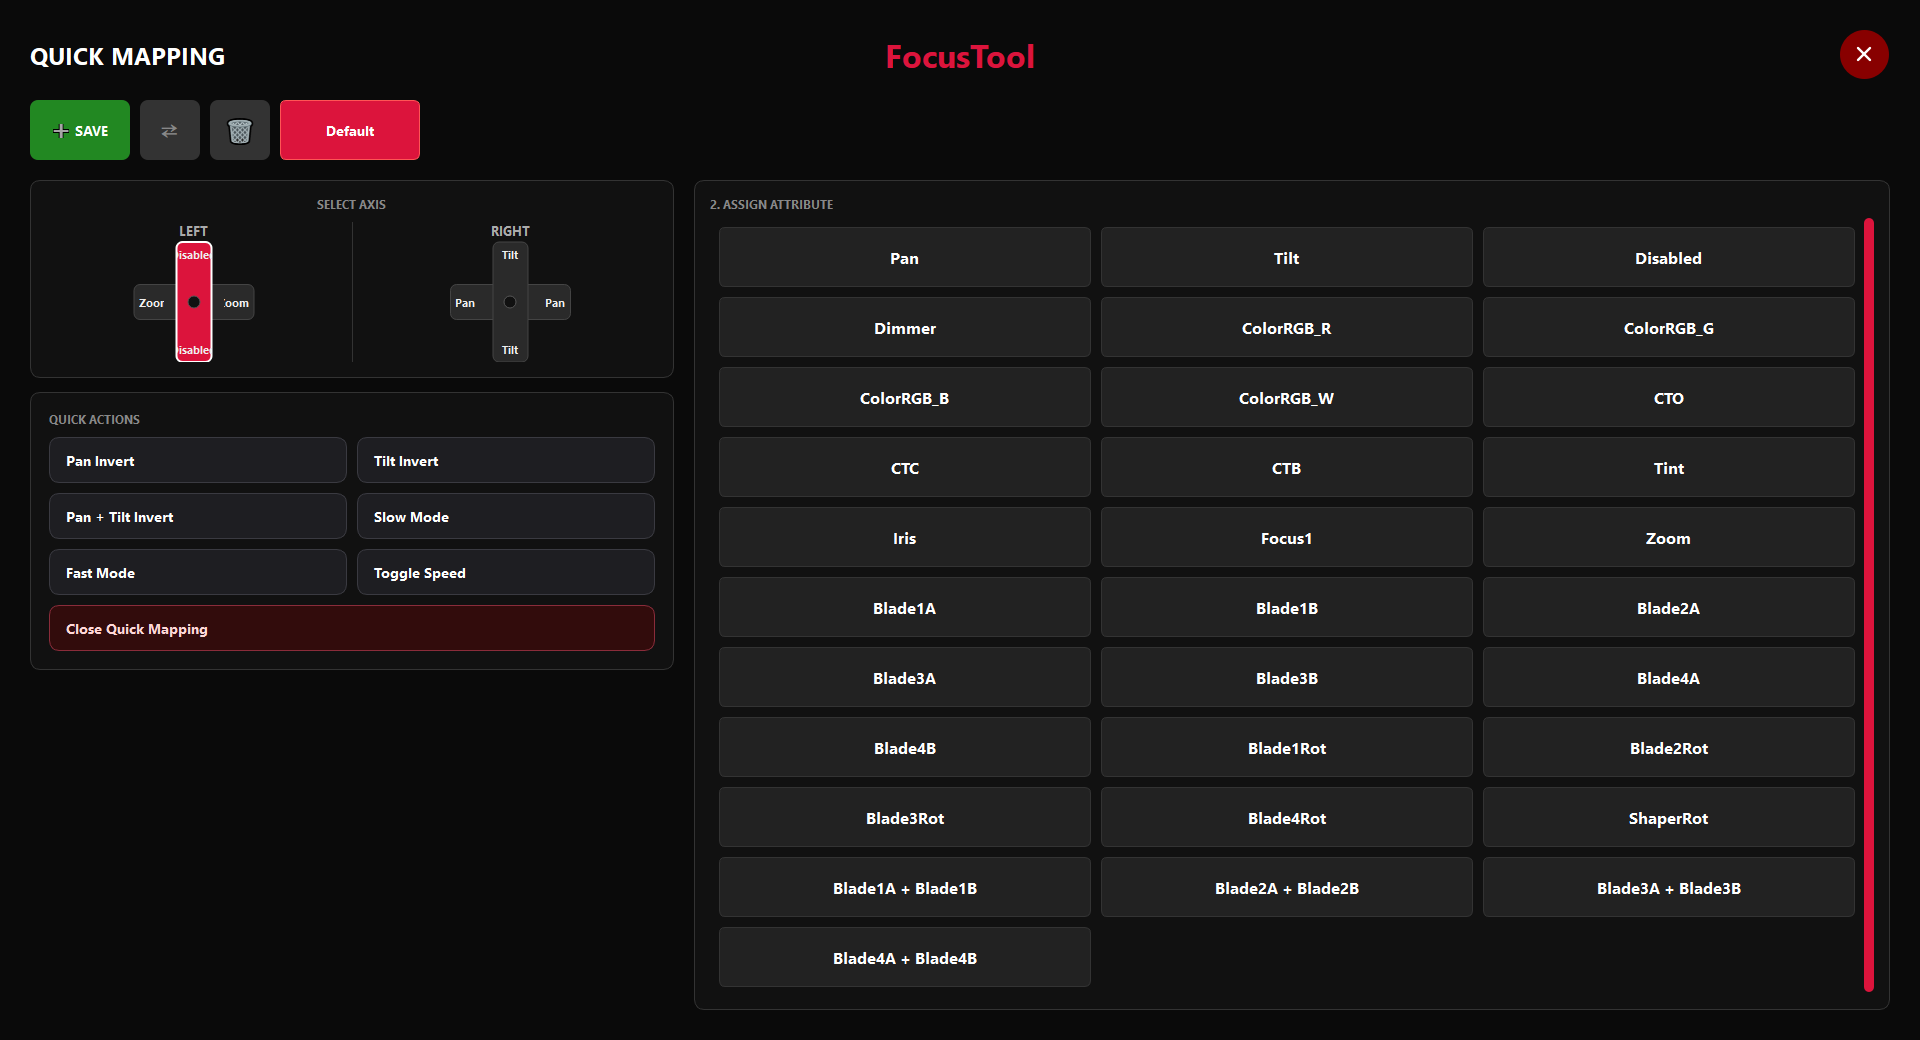
The Quick Mapping Feature
Quick Mapping is a fast and visual way to assign joystick axes to attributes.
1. Open Quick Mapping
You can open the Quick Mapping popup in two ways:
- Bind a button: Map a controller button to the "Quick Mapping" Built-in action.
- Web Remote Icon: Click the small "Quick Access" tool icon at the bottom of the Web Remote sidebar.
Note: The quick mapping popup only works in the Web Remote.
2. Assign Attributes
Once the popup is open:
- Move an Axis: Move the joystick axis you want to assign (e.g., Left Stick Up/Down).
- Select Attribute: A list appears. Click the attribute you want to control (e.g., Zoom).
- Done! The axis is now mapped immediately.
Note: A preset is generated automatically. You must manually save it to keep it for future sessions.
Mapping Attributes to Buttons
Attributes can be mapped directly to buttons as well as joystick axes. For example, D-Pad Up for Zoom In and D-Pad Down for Zoom Out.
- Direction: Choose Positive (+) or Negative (-).
- Speed: Choose between Slow (precision) or Fast (coarse) movement.
- Steps: Values change in steps of 1 for smooth digital control.
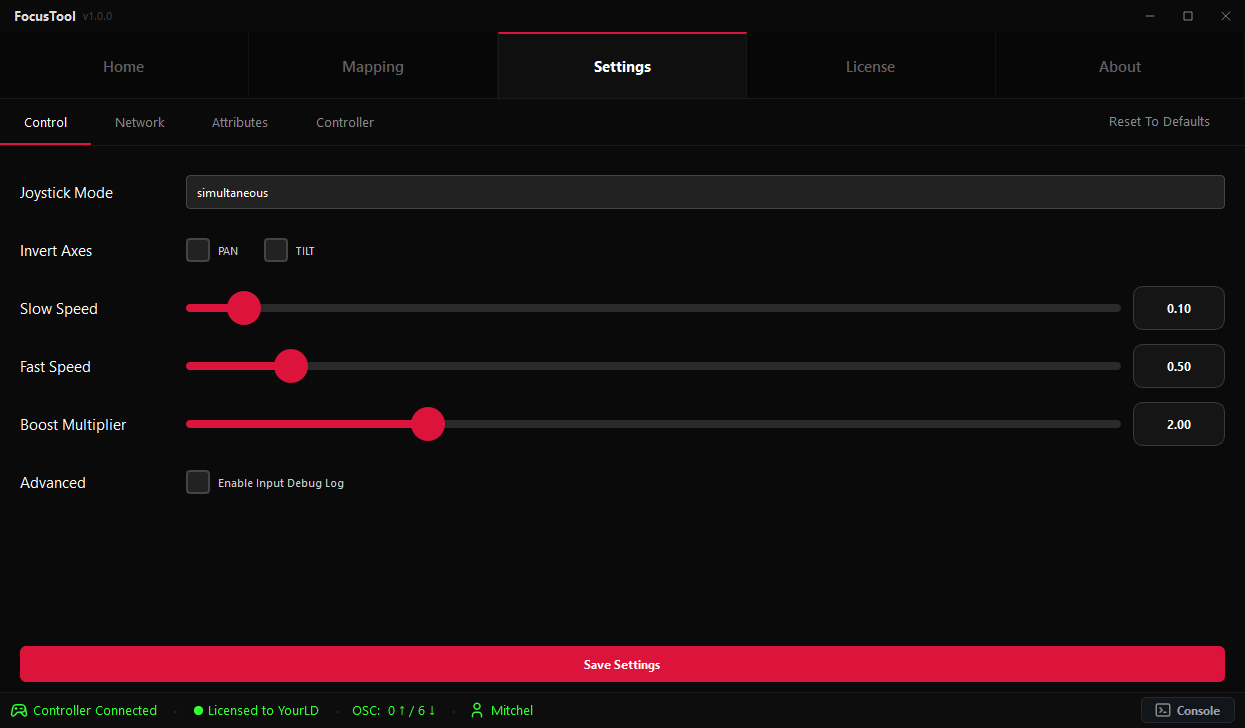
7. Settings & Customization
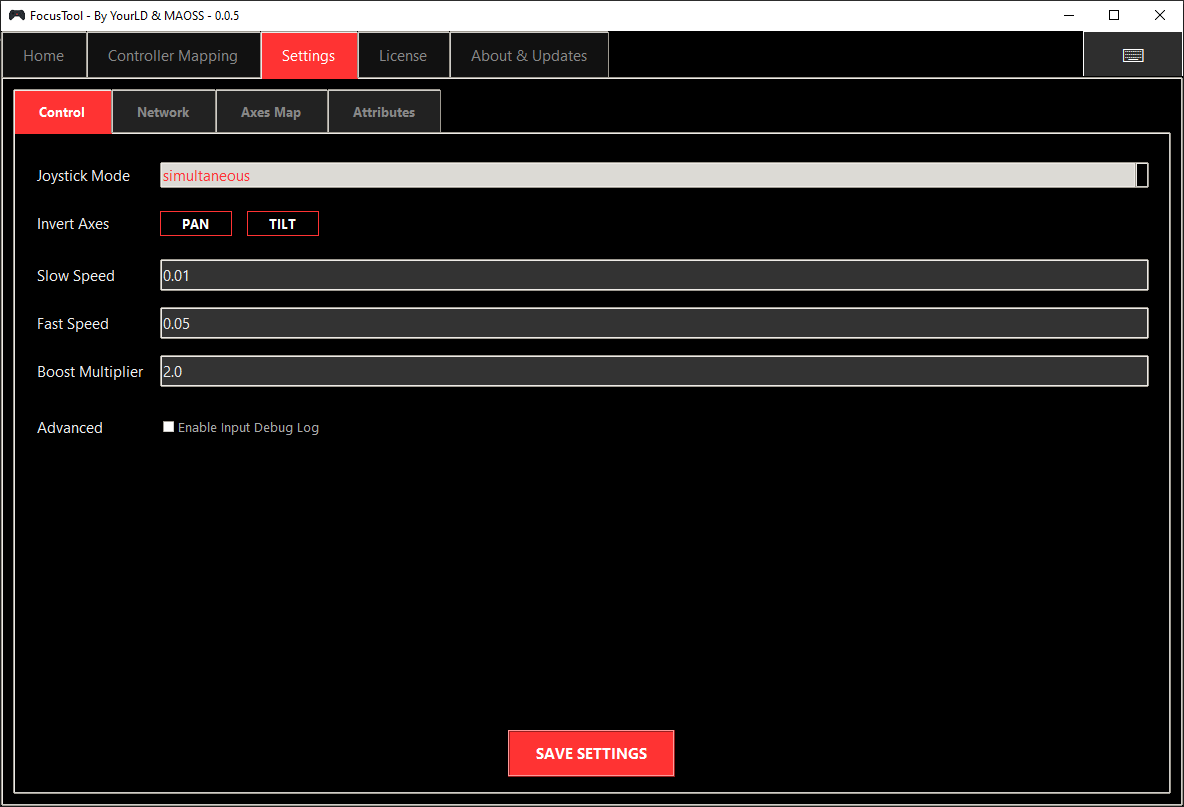

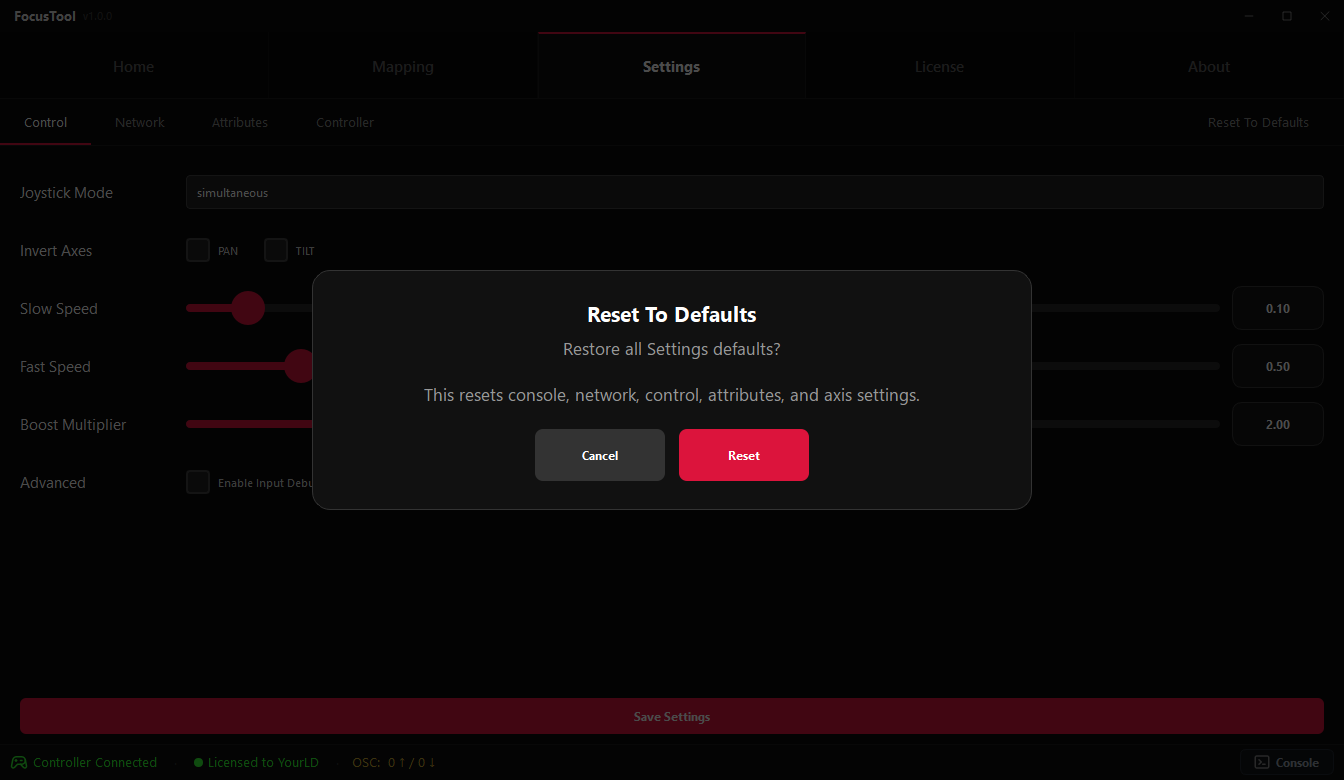
The Settings tab provides comprehensive control over FocusTool's behavior, from network configuration to movement sensitivity.
Movement & Control
| Setting | Default Value | Description |
|---|---|---|
| Slow Speed | Slider | Adjustable slider for base movement speed (precision work). |
| Fast Speed | Slider | Adjustable slider for increased movement speed (quick movements). |
| Boost Multiplier | Slider | Adjustable slider for the speed multiplier applied when a boost button is held. |
| Deadzone | Slider | Global deadzone slider for all axes. Sets the minimum stick input threshold before movement is registered. |
| Joystick Mode | Individual | Choose between 'Individual' (Pan/Tilt only) and 'Simultaneous' (Pan/Tilt + Attributes). |
| Invert Pan / Tilt | Off | Reverse the movement direction for the respective axis. |
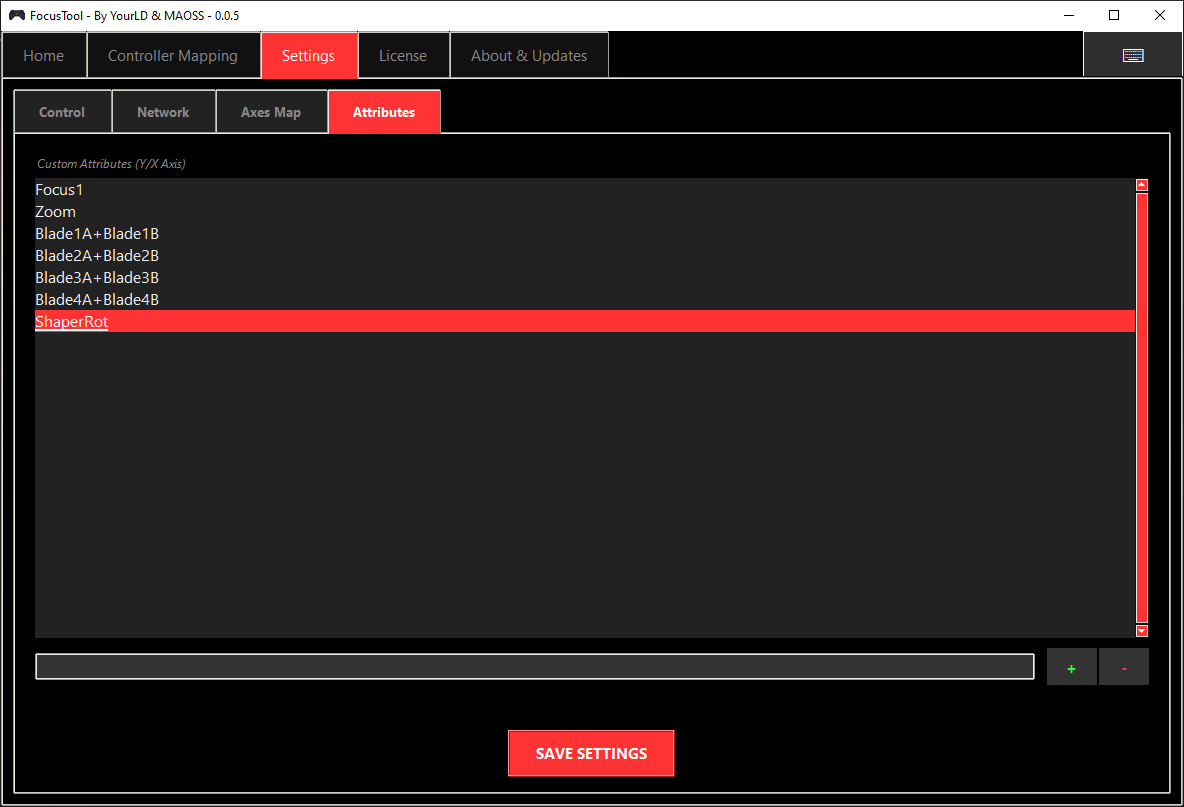
Attribute Library (Simultaneous Mode)
This section is where you manage the list of attributes available for assignment to the joystick axes via Quick Mapping.
Managing Your Attributes (grandMA2/MA3)
The Available Attributes list is your personal library of functions for grandMA2 and grandMA3 consoles.
- Sorting: You can now Sort the attributes in this list for a better overview.
- Add an Attribute: Type the grandMA3 attribute name (e.g.,
Shutter1) into the text box and click the '+' button. - Add Combined Attributes: To control multiple attributes at once, separate them with a
+(e.g.,Blade1A + Blade1B). - Remove an Attribute: Select an attribute from the list and click the '-' button.
This library populates the list used in the Quick Mapping popup.
8. Using FocusTool
Joystick Control Modes Explained
Individual Mode (Default)
Left Stick: Pan (X-axis)
Right Stick: Tilt (Y-axis)
Best for: Simple, direct Pan/Tilt control, similar to traditional console encoders.
Simultaneous Mode
Left Stick: Assigned Attribute (Y-axis) and Assigned Attribute (X-axis).
Right Stick: Pan + Tilt control.
Best for: Advanced users needing to adjust multiple parameters like Pan, Tilt, Zoom, and Focus at the same time.
On-the-Fly Workflow (Simultaneous Mode)
Using the new Quick Mapping feature, you can adapt your controller to the situation instantly:
- Ensure you are in Simultaneous Mode.
- Select your Fixtures using the Web Remote.
- Trigger Quick Mapping: Press your mapped button or click the Quick Access icon in the Web Remote.
- Move the Joystick Axis you want to assign (e.g., move Left Stick UP).
- Select 'Zoom' from the popup list. The axis now controls Zoom immediately.
- Repeat for other axes (e.g., Left Stick Left/Right for Focus).
- Adjust your lights! You now have full control over Pan/Tilt (Right Stick) and Zoom/Focus (Left Stick).
9. Web Remote Integration
Launching Web Remote
- Ensure Web Remote settings are configured in the Settings tab (grandMA2/MA3 only).
- Click "Open Webremote" on the Home tab (grandMA2/MA3 only).
- The Web Remote opens as an overlay within the main application window.
- Integrated Overlay: The Web Remote is embedded in the main application using GPU rendering for improved stability and performance.
- Quick Access Icon: Located at the bottom of the sidebar, this opens the Quick Mapping popup.
- Zoom Reset: Use the buttons to quickly reset the Web Remote zoom level.
10. ChamSys Setup
Overview
ChamSys MagicQ consoles work with FocusTool for joystick-based attribute control. To set up your ChamSys console for use with FocusTool, you need to download MagicQ and configure it on your handheld device.
Setup Process
Follow these steps to set up your ChamSys console with FocusTool:
- Download MagicQ from the official ChamSys website (chamsys.co.uk/magicq).
- Install and launch MagicQ on your handheld device.
- Set up your handheld in session on the desk. Connect your handheld to the same network as your ChamSys console.
- Choose Touch Interface in MagicQ settings to enable touch controls on your handheld device.
- Configure OSC on the master desk (not on the handheld). On the master desk console, follow these steps as described in the Network Configuration section:
- Navigate to: Setup → Multi Console → Enable Remote Control and set it to [YES].
- Navigate to: Setup → Network.
- Enable both OSC TX and RX.
- Set TX & RX Port to the same port (e.g., 9000 or 9001).
- Set OSC Tx IP to 0.
Important: These OSC settings must be configured on the master desk console, not on your handheld device.
- Configure FocusTool with your ChamSys console settings (see Network Configuration section for detailed OSC settings).
Using MagicQ with FocusTool
After setup, you can use both applications together:
- FocusTool: Handles joystick control, attribute mapping, and OSC commands for precise fixture control.
- MagicQ: Provides fixture selection, programming interface, and console management on your handheld device.
Both applications communicate with your ChamSys console over the same network. Make sure both are configured correctly:
- FocusTool: Configure the OSC Target IP and OSC Port in FocusTool's Settings tab (Network Configuration) to match your ChamSys console's IP address and the OSC port configured on the master desk. This allows FocusTool to send OSC commands to the ChamSys console.
- ChamSys Console: Ensure OSC is properly configured on the master desk console according to the Network Configuration section (OSC TX and RX enabled, correct port settings, etc.).
OSC Limitations & Future Improvements
MagicQ currently does not provide sufficient OSC capabilities for certain commands. We hope that ChamSys will expand OSC support in the future, which would allow us to provide more comprehensive support for advanced features in FocusTool.
For commands like Highlight, Solo, or other advanced functions, you need to create a macro in MagicQ and trigger it via OSC from FocusTool. We highly recommend setting up these commands through FocusTool, as it significantly improves your workflow by keeping all controls accessible from your handheld device.
Custom Commands via Macros (e.g., Highlight)
To use commands like Highlight with FocusTool, you need to create a macro in MagicQ that can be triggered via OSC:
Step 1: Create the Macro in MagicQ
- In MagicQ, navigate to: Macro → View Autom
- Click Insert Autom to create a new automation
- Set Type to: OSC Message
- Set P1 to the OSC address you want to use, e.g.:
/focustool/highlight - Set Function to: Run Macro
- Set P2 to: F1 followed by your Macro ID (e.g.,
F1 1for Macro 1)
Step 2: Configure FocusTool
- In FocusTool, go to Controller Mapping
- Select or add a button mapping
- Set Action to: OSC
- Enter the OSC address:
/focustool/highlight - Save the mapping
When you press the mapped button, FocusTool sends the OSC message to MagicQ, which triggers the macro (e.g., Highlight).
11. Updates & Maintenance
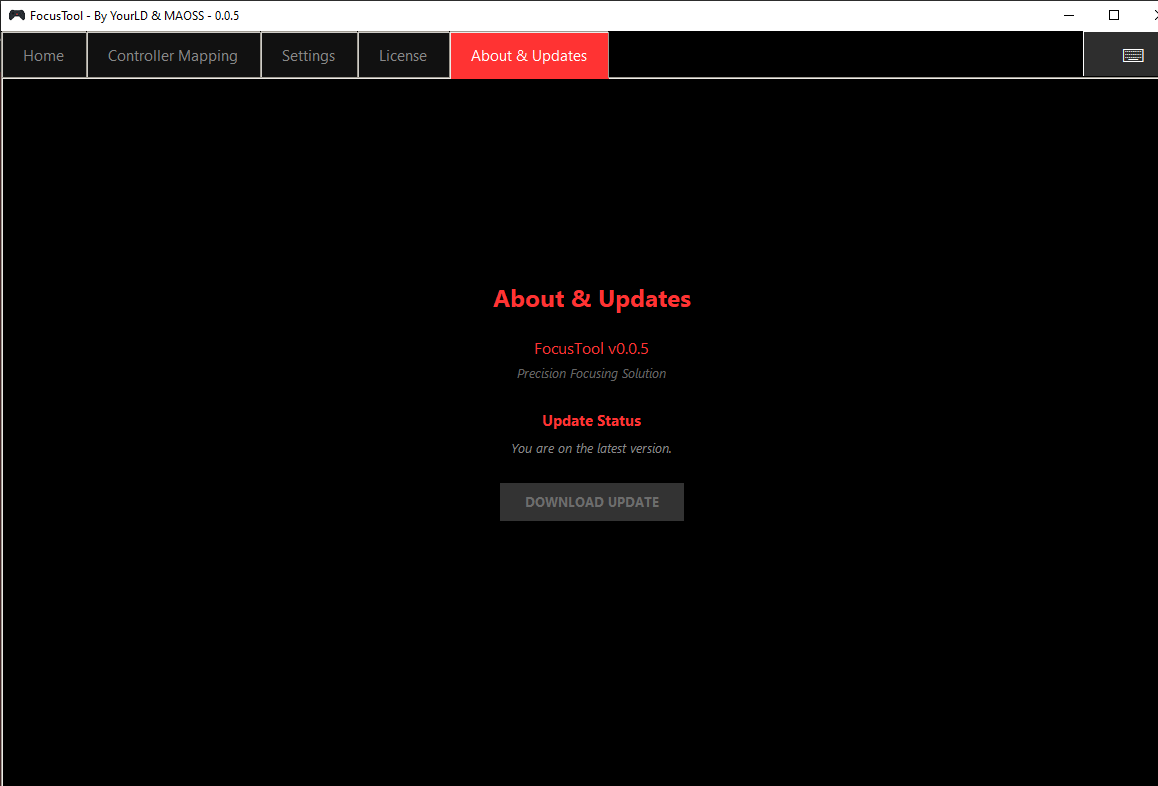
FocusTool includes a comprehensive update system to ensure you always have the latest features, bug fixes, and improvements.
Update Process
- Navigate to About & Updates.
- If an update is available, the Download Update button becomes available.
- Windows: the new build downloads, FocusTool prepares an update script, closes, installs the replacement and starts again.
- Linux / SteamOS: the new build is downloaded to your Desktop. You then launch that new file manually.
- Your settings, mappings and license data are kept during normal updates.
12. Light Meter Add-on
Licenses with the Light Meter entitlement will show an additional Light Meter tab in the app.
Opple Light Master Integration
Connect to an Opple Light Master to view live Lux, CCT, Duv, tint, battery and spectrum data directly in FocusTool.
CCT Auto Match
The Light Meter workflow can help match fixture color temperature using improved smoothing and reconnect handling.
13. Troubleshooting
This comprehensive troubleshooting section covers common issues and their solutions.
Controller Not Detected
Connection Issues
Symptoms: "Disconnected" status, no controller response.
Solutions:
• Ensure the handheld's controller is active and in Gaming Mode.
• Test the controller in other applications on the device.
• Restart FocusTool and your lighting console software.
OSC Communication Problems
No Response from Console
Symptoms: Commands appear in the log but no fixtures move.
Solutions:
• Verify OSC is enabled on the console with the correct IP and Port.
• Ensure your console user has rights to control attributes.
• Temporarily disable Windows Firewall to check if it's blocking communication.
• Restart your lighting console software. Sometimes the OSC service can hang.
Web Remote Popup doesn't work on Steam Deck
Browser Fallback
Symptom: Clicking "Open Webremote" opens the system browser instead of a popup.
Solution:
• This is the expected and correct behavior on SteamOS/Linux for maximum compatibility. The functionality is the same.
My attribute is not available in Quick Mapping
Missing from Library
Symptom: When opening Quick Mapping, your desired attribute is not in the list.
Solution:
• Go to the Settings tab and add the attribute to the "Available Attributes" list first. This list populates the Quick Mapping popup.
14. Support & Contact
How to contact us?
Contact: mitchel@yourld.nl
Before contacting us
To help us assist you more efficiently, please gather the following information:
- FocusTool Version (from the 'About' tab)
- License Email
- Handheld Device Model (e.g., MSI Claw, Steam Deck)
- Console Type & Software Version (e.g., grandMA3 onPC 1.9.7.0)
- A clear description of the issue and any error messages.